Physical Address
304 North Cardinal St.
Dorchester Center, MA 02124
Physical Address
304 North Cardinal St.
Dorchester Center, MA 02124
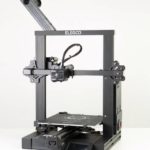
The Tronxy X5SA is a product of Shenzhen Tronxy Technology company which was established in 2015 and it’s based in Shenzhen, China. It’s a budget printer that manages to strike a fairly good balance between price and performance. It’s actually the first improved version of Tronxy’s X5S model, which was released in 2018.
The company has since then released a string of other upgraded versions and much like its successors, the Tronxy X5SA took care of some of the issues that the X5S model had and also added several more convenient features like auto bed leveling and double Z-axis lead rods.
Other improvements include a large build volume and 3.5-inch touchscreen control. It does also have all the other useful features present in the X5S model like a heated print bed, filament run-out detection, and resume print function.
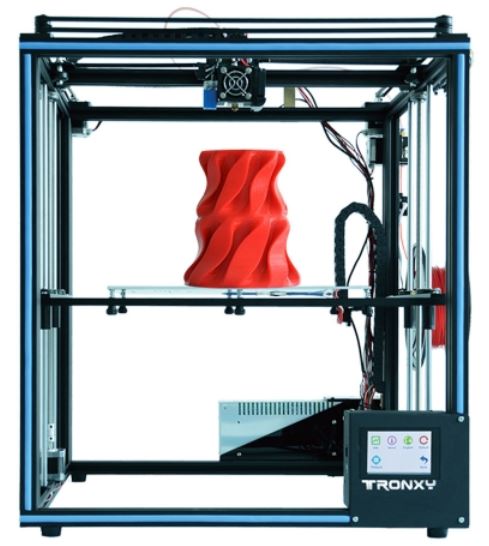
The Tronxy X5SA features a CoreXY 3D printer design which is different from the usual cartesian XY 3D printers due to the cube-like shape. The print head moves in the X and Y axis by employing pulley bearings and two long timing belts, each connected to a stepper motor. The movement is pretty stable and the motors are synchronized to facilitate better precision.
The print bed, on the other hand, moves up and down along the Z-axis, running on two lead screws and guide rods which is a typical CoreXY design. The printer utilizes linear LM8UU bearings.
This CoreXY design of the X5SA model and also of all the other Tronxy 3D printer models provide several advantages over the Cartesian 3D printer styles (X/Y/Z-coordinate).
First, the motors are stationary which means there are fewer vibrations and also less torque. There’s as well a gentle increase in the print speed. It’s a design structure that helps facilitate high precision printing. Moreover, the two Z-axis lead rods enhance the stability of the print bed – they help cancel off any vibrations that can interfere with the quality of the prints.
The major problem is that the two rods run independently. They can easily get out of sync, especially when turning the machine off and there’s no way to get them right back in sync. This means you may end up with an unleveled print bed which can lead to binding and uneven printing. Some reported too that the Z-axis driver is a little weak and can blow up.
The movement on the X and Y axis is stable but it does have a few hiccups as well, The X-carriage seems to have a “notching” problem with the wheels. There were several claims that even if you replace the wheels, the “notching” is still there.
The overall construction of the printer is great. It’s quite sturdy and well made. It features an aluminum double frame that keeps the whole structure very stable. The fact that it’s made of aluminum makes it more reliable compared to acrylic frame printers and much suitable for printing large-sized models.
The square shape is another advantage as it helps keep the printer very stable, plus the linear bearings are strong but they tend to wear out quicker than the pulleys.
The belt alignment is bad though and the tension is off. They sometimes ride up on the pulleys that are in the corners creating a lot of noise. Getting the right tension when setting up the printer is challenging too and there’s no belt-tightening system either – the belts may loosen over time, hence require tightening from time to time.
The unit uses a single Bowden-style extruder fitted onto the frame’s backside. The path of the extruder tube tends to interfere with the carriage pulley, and this can cause it to catch and hang during certain moves, or even crash the machine.
The hot end itself is much similar to that of the Creality CR-10 and Ender 3 printers. It features a small heat sink, plus it’s quite prone to heat creep and jams frequently. The fan shroud is also crooked and it makes the bed level sensor to hang down very low on one side.
That said, the manufacturer has tried to keep the printer neat and lined up everything nicely. Most of the complex wiring and cables are enclosed in a mainboard box. The wiring for the printhead and hotend is also routed through a drag chain towards the printer’s back part which helps mitigate the obvious DIY-look that the printer clearly exudes.
However, the power wires that connect to the print bed are not covered at all with Kapton tape or any other tape which poses a safety concern.
The whole unit is large (25.16 x 21.5 x 25.8 inches). It takes up a bit more space than other desktop printers and it’s heavy too, weighing around 28.6 pounds. It’s designed in a manner that carrying and transporting it is easy, despite the large size and weight.
The single Bowden extruder is fitted with a 0.4mm nozzle and can heat up to 518°F (270°C) which is sufficient to handle different printing materials. The nozzle is able to provide a layer resolution range of 0.1 to 0.4mm, which is equally pretty decent.
The quality of prints is relatively good for most projects, although it takes some tweaking in order to get it printing reliably or deliver better results. You get very good quality prints, particularly at 0.1 and 0.2mm layer resolution. Even so, the unit appears to have lots of issues with regards to print quality.
First, the printing can sometimes get a bit hazy or fuzzy. Secondly, you have to keep the cogs and bolts tightly screwed, otherwise, the extruder nozzle can ooze out, thereby leaving behind bits of filament on the print causing you to end up with a not so fine object.
The “notching” problem of the X carriage is another issue. The notch usually transfers to the print as a tiny pockmark line on the X-axis. The Z-axis linear rods are also not well secured in place, meaning that they can move as a result of the clearance of the machine’s screw holes, and this can lead to Z-banding on the prints.
The other problem is that the motors sometimes skip steps causing the prints to become horribly shifted or even end up becoming a pile of spaghetti.
The printing speed is impressive, though, which is a credit to the sturdy cube frame. It can take up to 150mm/s to print models which is quicker than most I3 style printers. Many mentioned that the print speed is 20-40% faster than the equivalent size I3 printers they had.
The X5SA provides a build volume of 13 x 13 x 15.7 inches. It’s a large print area that gives you the liberty to experiment with big objects. The print bed itself is 24V powered and it heats up relatively quickly and evenly. It takes about 6 to 10 minutes to reach 75°C.
Four clippers hold it in place but it’s removable. It has a Builtak-like surface with strong adhesive properties. The prints stick to it very well, but unfortunately, removing them is a hassle because they strongly stick to the bed such that blunt force is required to remove them.
The extruder nozzle also tends to get too close to the print bed in some spots which can cause pieces of filament to fuse with the surface of the bed and become impossible to remove. A heavy-duty scraper is provided which you’ll definitely need to remove the pieces of filament.
The sticker is not durable either. It can easily tear as you try to get a print off, especially if using the included scraper. Some also pointed out that it begins to come up a bit along the edges after using the printer for a short while.
Featuring a heated build plate, and an extruder that can reach up to 270°C, the Tronxy X5SA is capable of printing with a variety of materials. It can support multiple filaments such as PLA, ABS, HIPS and also flexible materials like TPU.
It, however, works best with PLA. You may not get good results always when using ABS and other materials that are very sensitive to temperature changes – the open-frame design exposes the build area and the print to the room temperature.
One of the key differences between the X5S and this X5SA model is the 3.5-inch full-color touch screen, which replaces the old LCD screen. It’s bright, clear, and seems to work well, although it’s a resistive touch instead of capacitive touch hence it’s a bit slow and requires hard presses.
The menu system is also unintuitive. The texts are of small size making reading them a bit of a struggle and figuring the firmware out (how and what to adjust) is not easy too. The interface is somewhat confusing, especially if you’re used to Marlin interfaces. For instance, there are no preset options for preheating. You have to increase or decrease the temperatures manually.
The firmware also has a fatal flaw. It sometimes randomly reboots in the middle of a print. It’s something likely caused by either some software bug or bad memory on the printer’s control board. A few users reported that the controller can occasionally reset several times if left running more than 24 hours.
That said, the printer includes all the features found in the original X5S model including filament runout detection and the resume print function that allows it to resume a print even after a power outage or some other unexpected stoppage.
As for connectivity, there are only two options available – you can print from an SD card or using a USB drive. There’s no Wi-Fi connectivity. You have to use the Tronxy slicer to generate the g-code for your model, load it to an SD card or a USB drive and connect it to the printer in order to initiate the printing process from the onboard touchscreen.
The XS5SA comes with Tronxy’s slicer which is a proprietary skin of Cura slicer (15.04.06) and it’s compatible with Windows, Mac OS and Linux operating systems.
The software is rather basic with regards to altering print settings. It doesn’t offer much in terms of functions and tools for modifying your 3D designs. It only provides rudimentary print control.
It also appears to have several issues. For example, the tool path it generates seems a little more optimized to increase stringing. Besides that, it tends to radically underestimate how long a print job will actually take to print. It estimates the print times at almost half of what the printer actually takes.
Alternatively, you can use a more versatile slicer such as Repetier-Host or Cura (for which there’s an XS5A profile). The printer itself supports G-code file types.
The whole unit comes as a DIY kit and it’s well packaged with plenty of extra hardware. It comes with almost twice the amount of nuts, screws and washers, more than what you actually need to complete the build. You are left with extra screws and T-nuts for any mods you would 3D print for the printer.
The package includes a 1Kg filament and the spool holder which is not strong – it bends over time, causing the spool to bind and the print head to under-extrude.
The assembly process might be slightly challenging and can take a while (5 hours or more), particularly if you are setting a 3D printer for the first time. Only a few parts come pre-assembled like the PSU and the hot end. You’ll have to set up most of the parts on your own and the assembly manual is not even helpful.
There are lots of sections where descriptions are not very clear or steps are skipped, which can almost certainly cause confusion and frustration for first time builders, and make the assembly process a bit more difficult.
Loading the filament is relatively simple although we noted a few reports of the extruder drive running backwards and pulling the filament out rather than pushing it into the extruder nozzle.
The extruder also seems to have the same issue – when you press the manual extrude button, the filament is pulled out instead of being pushed in.
On the upside, the unit is equipped with a filament-run-out detection feature like its predecessor, the X5S model. It has a sensor that can detect when the filament is low or used up, and alert you by setting off a beeping alarm. It automatically pauses the printing until the filament is changed, so it’s a handy feature if you often print larger parts.
Bed leveling is a little tricky. The auto-levelling function doesn’t really take the hassle out of the bed leveling process. The sensor measures 16 points across the bed, and instead of adjusting the build plate on-the-fly, it just shows relative height data on each of the 16 points so that you can tell the differences in levels and know where you need to adjust to compensate.
There are 6 bed-leveling knobs that you have to adjust manually to try to make the bed even. It’s not automatic in any way, probably assisted bed leveling, but it’s better than completely manual ones.
Some did mention, though, that the build plate isn’t completely flat. There are uneven areas which the sensor doesn’t pick up requiring you to print with rafts or fatter layers.
The bed doesn’t keep its level either because the motors are not in sync and they don’t feature an endstop (the leveling probe takes on that task). You have to check it and re-level it before almost every print since the probe is much more error-prone compared to a physical endstop.
Belt alignment is also very bad out of the box. The belts sometimes can ride up on the pulleys around the corners and make lots of noise and even create artifacts in the print. You can’t loosen them because it causes so much slack in the movement.
In general, though, the machine is quiet when you fix up the flaws and have everything working properly. It has an active noise reduction function that modulates the voltage carrier so as to minimize the current wave and cancel out the noise. You just slightly hear the steppers and fun running when you are close to the printer. It gets only loud when printing at high speed, but if you enclose it, you can barely hear any noise.
Tronxy provides a one-year warranty for the X5SA and lifetime technical support. As far as customer support is concerned, they are responsive and helpful.
You can get in touch with them on their website which is in English. There isn’t much content there, however, you can access contact information like the email id and phone number. The company offers 24-hour customer service, so you can contact them anytime if you have any questions or any problems with the printer.
Tronxy also seems to honour their warranties as many reported that they send replacement parts for aspects covered in the warranty with no hassle – there’s no free replacement service for machines purchased from third parties.
As for the community support, there’s certainly not much out there like other printers. The Creality Ender 3, for instance, is very popular with a wide community of users and forums where you can access information and get help from other users.
The Tronxy X5SA series includes 6 models namely, the X5SA (the base model), X5SA Pro, X5SA-2E, X5SA-400, X5SA-500 and X5SA-500 Pro.
All the six models share almost the same CoreXY design and some functions such as auto leveling, power-off resume print, and filament run-out detection. However, each offers certain improvements over its predecessor with the primary ones being a larger print volume and the number and type of extruder.
The X5SA Pro, for example, offers three major improvements over the X5SA model. It features a double guide rail system which helps to improve the printer’s stability and increase print accuracy. It has more metal parts too and this results in a more sturdy frame.
The most important upgrade is the inclusion of a Titan extruder which enables you to print with a wide range of filaments, especially with flexible materials like TPU.
The X5SA-2E, on the other hand, is an upgrade of the X5SA-Pro model and the key difference is that it comes with a dual Titan extruder, hence it supports two-color filament printing. It also features a dual filament-run out detection function. However, it offers the same print volume as the X5SA and X5SA Pro models.
The X5SA-400 is much similar to the X5SA in terms of design and functions – it utilizes a single Bowden-style extruder. What sets it apart is that it offers a large build volume (15.78 x 15.78 x 15.78 inches) compared to the X5SA, X5SA Pro and X5SA-2E.
The X5SA-500 and X5SA-500 Pro are slightly different from the rest with regards to design. They have the same dual-frame design, but with the touchscreen control mounted at the top right corner of the frame. They equally provide a larger print volume (19.68 x 19.68 x 23.62) than the rest. The main difference between them is the extruder. The X5SA-500 Pro utilizes a Titan extruder while the X5SA-500 uses a Bowden-style extruder.