Physical Address
304 North Cardinal St.
Dorchester Center, MA 02124
Physical Address
304 North Cardinal St.
Dorchester Center, MA 02124
The M3D Micro is an inexpensive 3D printer with an attractive and compact design. It’s relatively simple to use and even though it’s small, it manages to produce prints that are of decent quality.
Besides that, it has some convenient features such as automatic print head calibration and internal filament spool holder. It’s a good option for beginners looking for a reliable low-cost 3D printer. However, it has some limitations like its printing speed is very slow, it has a small build area, and it offers just a single connectivity option.
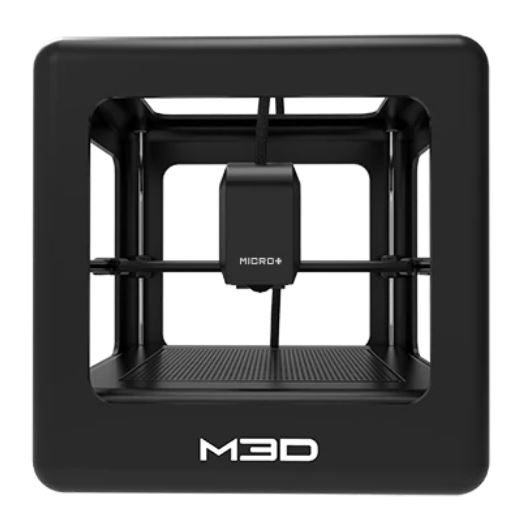
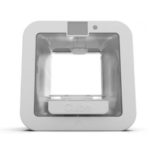
The M3D Micro is certainly one of the cutest little 3D printers on the market. It has a small open-frame cubic design with rounded edges and colorful frame that’s available in six different colors. The simple and playful exterior is quite attractive and more inviting than most printers.
The whole look is very neat. Cables and wires are all hidden, and there are no buttons or controls, just an LED-illuminated M3D logo that shows when the printer is turned on. The only part that pokes out is the feed tube which goes from the reel into the top of the extruder.
Inside the frame sits the printing mechanism consisting of the extruder/print head that’s attached to rods and belts which move it forward and back (Y-axis), left and right (X-axis), and up and down (Z-axis).
The print bed doesn’t move and it’s made of slightly textured plastic known as BuildTak. You can remove it by sliding it back and then lifting it, which allows you to easily remove the completed prints from it. The filament spool is stored underneath the bed, which is convenient and further enhances the printer’s clean look.
With the open design, you can monitor the printing progress easily although it makes the printer unsafe to use around small children. The build area being exposed also means that it’s hard to maintain a consistent temperature which is necessary when printing sensitive filaments like ABS and PTEG.
The entire unit measures about 7.3 inches on each side, hence it doesn’t take up much space – it can fit on any small desk. The frame is made of light plastic while the rods are carbon fiber, so the whole unit is pretty lightweight, weighing just 2.2 pounds. It feels sturdy and stable despite being made almost entirely of plastic. The cube shape makes the frame rigid although it’s not particularly strong like aluminum frame.
The extruder motor is, however, not that robust and the extruder itself sometimes wanders off course – it can end up crashing into the print bed or even on to the printer’s front edge thereby causing damage. The motherboard is equally sensitive – a power outage can easily kill it.
M3D uses a single extruder that features a 0.4mm nozzle and it can reach a maximum temperature of 270°C. The nozzle provides a layer resolution range of 50 to 350 microns, meaning it’s capable of printing fairly detailed objects.
Many reported that the quality of the prints created is often decent. Layers remain relatively consistent along both the X and Y axis (which is usually a struggle for most printers within the same price range).
The printer does well too when it comes to producing sharp and straight edges – prints like a geometric sculpture model get reproduced with clean edges and minimal stair stepping from the layers. The edges are usually crisp and well-defined.
The M3D also did a good job in printing a 3DBenchy tugboat. Fine details came through quite well and it appeared not to struggle a lot with small unsupported overhangs and spans.
It managed to successfully print the Thinker test model too, which features lots of organic curves and smooth edges. Most of them were well-produced, especially the smooth curves of the head and shoulders – they had a smooth, organic look.
However, the printer does have a few issues and one of the biggest is that it’s prone to producing “hairy prints”. It leaves a lot of whiskers of print material on the models as the print head moves over gaps, particularly between edges, on areas with an overhang or supporting structures. The edges of the geometric sculpture, for instance, had lots of whiskers.
In some cases, like the Thinker model, odd patterns which were not present in the original model appeared on the surface (sides) of the print, making the Thinker look like it has some kind of unpleasant skin condition.
There were also reports of occasional clumps of filaments being left on the edges of prints. This is a problem caused by the print head often jamming due to molten filament getting stuck and blocking the print nozzle. The odd lumps of melted material gather on the nozzle and end up sticking to the model as it’s printed.
A couple of the prints/objects did show a fine porousness in spots, although this can easily be rectified by changing the fill density setting from the hollow mode to low infill model.
The M3D is a very slow 3D printer. Printing standard-size models in all the print-quality modes it offers takes longer than other printers in the same price range.
A 1 x 1 x 1 cm cube, for example, at the lowest resolution of 350 microns and the lowest infill settings took just over 11 minutes to complete and this is the fastest possible configuration.
At medium layer resolution and medium fill, the printer took around 18 minutes to finish the cube while at the high layer resolution and high infill it took even much longer (over 26 minutes). In comparison, the Ultimaker 2 is able to print the same cube in around 7 minutes and 50 seconds with medium configuration of 100-micron layer resolution and 100% infill.
Printing a 4.2-inch version of the Thinker test model with the M3D took about 14 hours to complete using PLA filament and low-quality mode ( layer resolution of 0.3 mm).
In the high-quality mode (layer resolution of 0.1mm), the same model took about 25 hours and 34 minutes to finish. That’s super slow considering that a printer like the Polar 3D, can take 6 hours and 51 minutes to deliver a medium-quality print of the same model.
The build area of the M3D is 4.4 x 4.4 x 5.4 inches. It’s fairly small and limits the size of items you can make since you can only create prints that are no larger than a 4.5-inch cube.
It’s not uniform either – it’s a bit wider than it is deep. Nonetheless, it does offer considerable flexibility for most small projects, plus you can always print larger models in several parts and attach them together.
The print bed is non-heated too, which means printing anything besides PLA is not advisable because most likely it won’t give you the best quality. Although the print head can support the ABS filament, it can be a bit challenging to produce complete prints.
The print bed is made from a plastic material called BuildTak. The surface is slightly textured to ensure prints stick to the bed, but it only works effectively with PLA. ABS prints usually don’t stick – the base of the prints tend to detach from the bed making the print to fall off or warp. You’ll have to use either a glue stick or painters tape for the prints to stick to the bed.
The M3D is capable of printing with various filaments, unlike other entry-level printers which usually support only a handful of different materials. It can work with ABS, PLA, PTEG, and Nylon. You can even utilize carbon fiber if you want as long as you have the right nozzle upgrade – something very few budget 3D printers support.
The M3D sells half-pound reels of PLA filament (known as 3D Ink) for $14 each. It equally sells color-changing PLA filament (known as Chameleon 3D Ink) for around $18 to $23 per reel. This is slightly less compared to the MakerBot’s $18 half-pound PLA spools.
M3D does as well sell ABS filament which it calls Expert 3D Ink, for $14 per spool. However, the company doesn’t recommend ABS for new users because it claims that ABS is challenging to print with successfully even for many larger models and can produce a strong odor.
M3D does not also restrict you from using third party filaments, it can work with any standard 1.75mm filament from any other company. You will, however, need to mount the reels externally because the cavity underneath the bed can accommodate only 5-inch spools which are too small compared to regular spools.
As we mentioned earlier though, PLA seems to create the most successful prints with this printer despite it supporting ABS, Nylon and other materials. Using ABS, in particular, will result in failed prints most of the time since they don’t stick to the print bed.
The Micro is controlled entirely from the M3D software, which you can only access from a computer because there are no mobile or tablet versions. The program itself is functional and has a simple interface that makes it easy to learn, navigate and use.
The downside though is that while many printers usually offer multiple connectivity options, the M3D Micro offers just one, which is the USB cable connection. It doesn’t have an SD card slot nor does it support Wi-Fi connection. You have to connect the computer to the printer via a USB cable throughout during printing.
Another problem is that the printer doesn’t have any onboard memory so once the USB is disconnected from your laptop, any ongoing print job will be lost and the job does not resume where it left off even after reconnecting.
Moreover, the computer has to remain awake at all times since if it goes to sleep mode, the print job gets terminated. If the software is also closed at any point during printing, then the job would equally fail. You can’t as well use the M3D program when the print is in progress – you have to wait until the model is complete.
Besides that, when the print is still ongoing, there is a dialogue box that pops in the program showing a percentage meter. It doesn’t display how much time has remained during the print process and the estimates given from the beginning are usually misleading. For instance, a print could be estimated to take about 16hours but it ends up taking even more than 25 hours.
The M3D Micro utilizes its own, specially-designed software that’s only available for Windows and Mac operating systems. There’s no Linux support. It’s, however, the simplest software to use as mentioned earlier.
The top part of the main screen features three icons which included the filament spool icon labeled 3D Ink, a file folder that’s labeled Open Model, and then a gear icon, that you use to calibrate the print bed.
The software provides a preview of the model plus several important functions and features for customizing certain aspects of the printing process including scaling, moving and rotating the print. You can also determine the fill density and print quality from the software. Advanced features like support structure options are equally available on the software.
A very nice extra feature we noted is being able to set filament profiles – it’s a handy feature that allows you to tweak the settings based on the particular filament used and then save them for future use.
You can’t, however, control most of the more advanced features like the print head speed, wall thickness, the type of internal fill used or the number of supports the system adds to the model while building. So, there are limited options for modifying a model and you can’t build a new one either using the software – you’ll need to use a separate 3D modeling software to do that.
The printer comes well-packaged in a box that carries its image plus a colored dot right at the bottom to let you know what model you have inside. Alongside the printer, the package includes the power adapter, USB cable, one starter pool, a full specifications list, and user manual. The whole printer is so well protected with the print head held securely with blue tape and clips that prevent any movement on both the X and Y-axis.
Setting up the unit is quite simple. There’s not much to do apart from loading the filament and installing the M3D software. It’s not an ideal option if you’re interested in learning and understanding how exactly 3D printers work.
You can load the filaments either externally or internally. External loading means you have to attach a separate spool holder outside the frame of the printer and feed the filament to the printer via the secondary feed hole in the top of the print head.
For internal loading, you install the filament spool underneath the print bed. You need to hold the filament spool outside the machine first and then feed the filament via the sleeved guide tube. It’s a bit challenging but becomes easy when the print head is set in the home position. Another issue is that the internal port can only accommodate half a spool at a time – you have to either get smaller rolls or re-spool about half of it each time.
While making sure the bed is level is sometimes a hassle with most 3D printers, M3D has made it easier by having a calibration feature that you run from the software.
The bed does not physically move, instead, the print head is fitted with a motion sensor that makes sure it’s correctly positioned just above the print bed. It’s an automatic process and the print head can detect when it comes into contact with the print bed and adjusts itself accordingly – it can’t go far down to the point where it can actually damage the bed.
Compared to other machines, the M3D Micro is a very quiet printer. It makes subtle noise while printing. You only hear the buzzing of the motors as they move the print head and just a slight fan noise.